


How to tie a tanzen obi
(Slowly getting more visual information on how to make some knots in the tanzen obi)

Butterfly knot

Butterfly knot

1) Start with folding the tesaki (手先) in half. The beginning of the winding start of the band is called "hand (tesaki)"

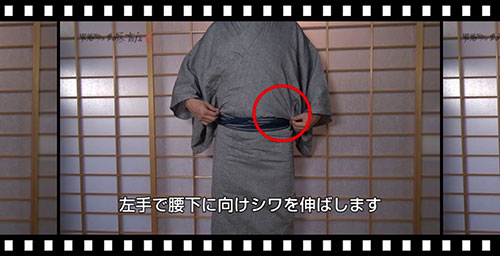
2) Hold the "hand" with your left hand and wrap it around the pelvis

3) Let's let 'hands' escape onto the belt when we have finished winding around the belt. Let's narrow the band "strongly" every time it winds up.

4) After winding the band for about 3 turns, tie "hand" so that it passes inside the belt.

5) Holding the winding end part of the band with your right hand, use the left hand to firmly tighten the start of winding.

6) Wrap the remaining portion of the winding end of the band "tare" on the knot. The portion of the end of the winding end of the belt is called "dripping". I will fold "tare" on the band's knot.

7) Adjust the length of the end of the obi (tare) to about 20 centimeters. This part determines the size of the butterfly's wings.

8) Beginning of winding of the band Tie the start of the belt "hand" so that it passes inside the belt. Tie the "hand" so that it passes through the center of "folding back".

9) Raise the band start portion "hand" to the top and tighten the band with a sharp pull. Wrap the "hand" around the band for about 2 turns.

10) Pinch the remaining "hand" between the bands. Let's keep it beautifully so that "hands" do not come out of the belt.

11) Let's shape the belt with both hands. We prepare the band so that the "butterfly feathers" will spread cleanly.

12) After adjusting the shape of the belt, turn the belt clockwise and bring the knot of the belt to the back.

13) The knot of the belt is not just behind, it is stylish to "slide a little".
Found these images and instructions at Kyo-ya
Bow knot

- 1. Position the middle of the obi at the front of your body
- 2. Bring the sides of the obi around your body to the back
- 3. Cross the two ends at the back
- 4. Bring the two ends back again to the front
- 5. Pull the ends to make a snug fit
- 6. Tie a bowknot like you would do your shoe's
- 7. Push the knot off center at the back (not middle)
- 8. If the ends of the obi are too long, try pushing them inside
Bow unknown

Some ways to fold a tanzen obi


1) First, fold the end as shown in the picture. At this time, the part where the red line is drawn becomes one side of the pentagon, please adjust it to just about the length.

2) Next, fold back so that the right end of the previous red line fits the end of the band. At this time, please adjust so that the red line of the image below has the same length.

3) Afterwards, with patting up ...

4) Just turn around.

5) Lastly, fold the last remaining piece into the pentagon ...
6) Finished
Found these images and instructions at Ushigyu.net
A very simple but effective way to fold an obi:

Fold the tanzen obi in half

and again in half

until you reach the size you are satisfied with

You can store it flat or folded one more time standing up for a better view when selecting which to choose